Please register to participate in our discussions with 2 million other members - it's free and quick! Some forums can only be seen by registered members. After you create your account, you'll be able to customize options and access all our 15,000 new posts/day with fewer ads.
This subject sort of came up before. What was the best way to install under cabinet lights in the kitchen?
I said it was best to make up a custom wood wire way. Only I never had done it before. For money, typically you just cobble together a wire harness and slap that in there about like the instruction books pretend it can be done. But I am finishing up some of the projects on the old road shack and it came time for the under cabinet lights in the kitchen, so I followed my own advice.
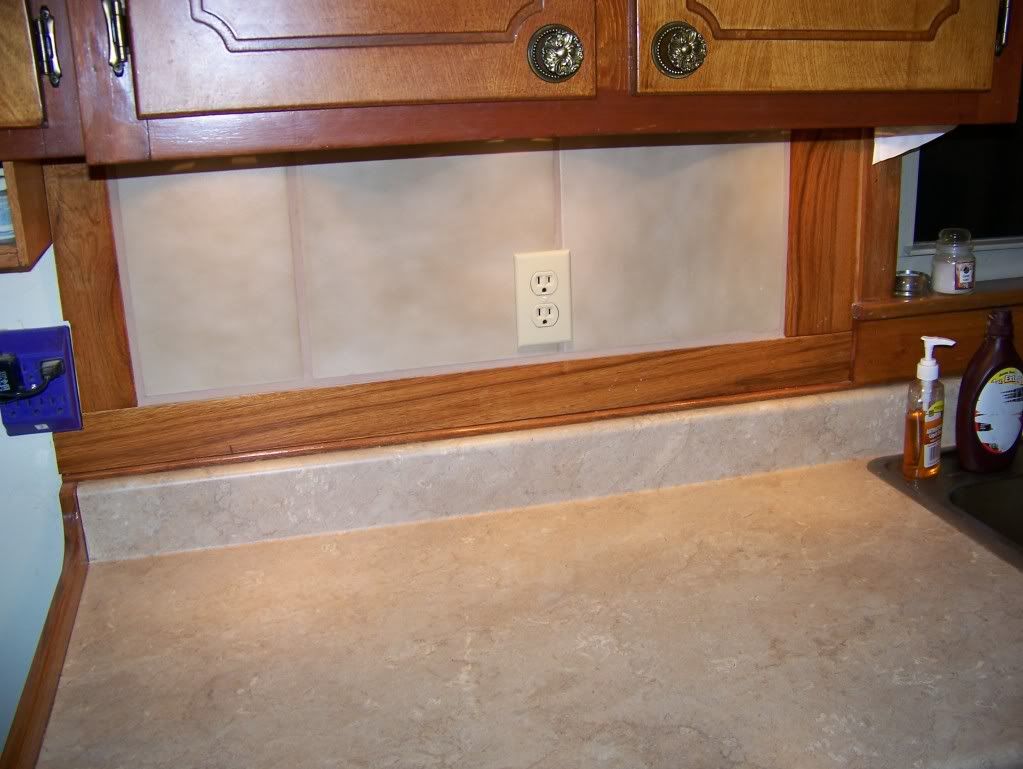
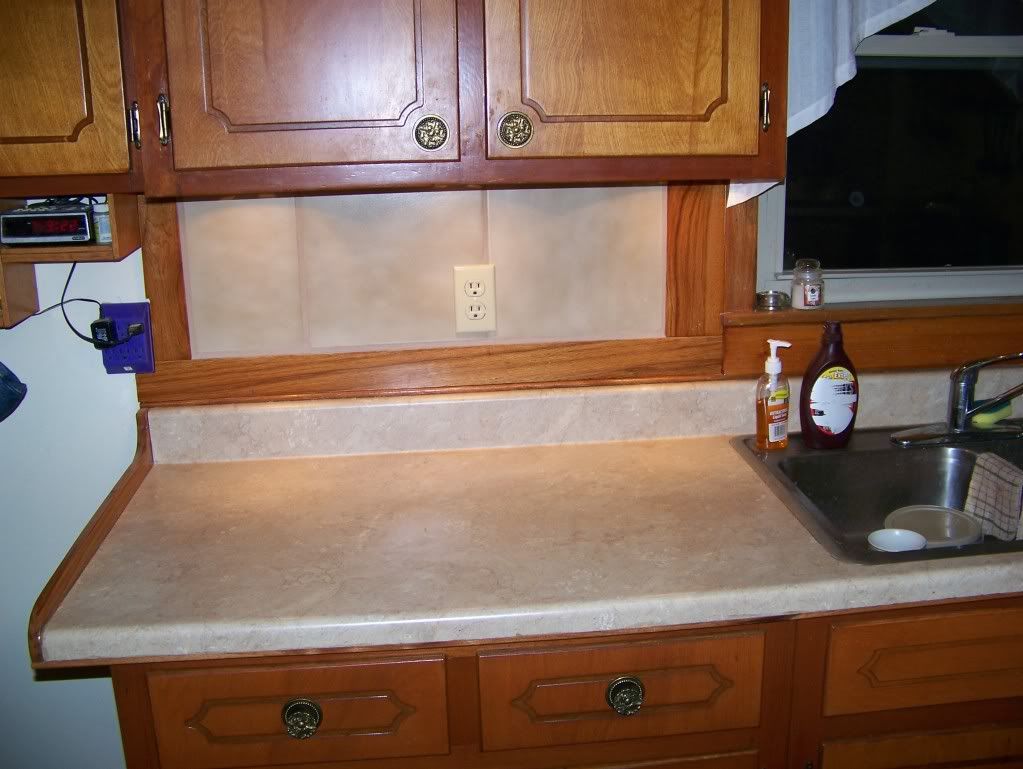
Here is what it looked like.
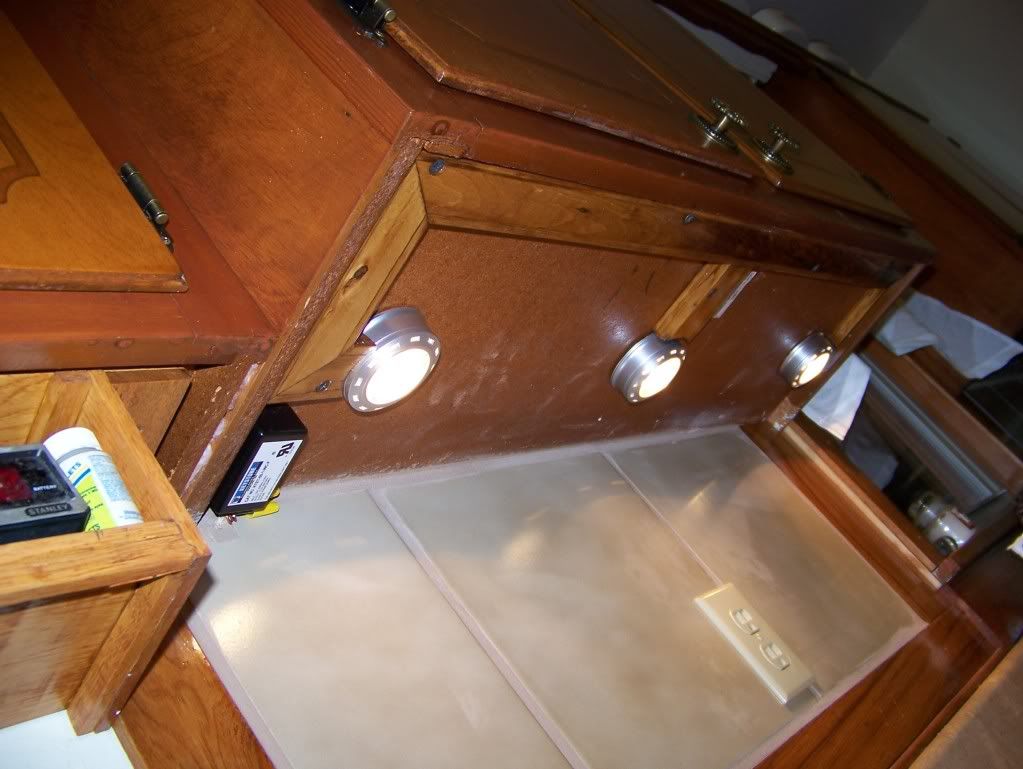
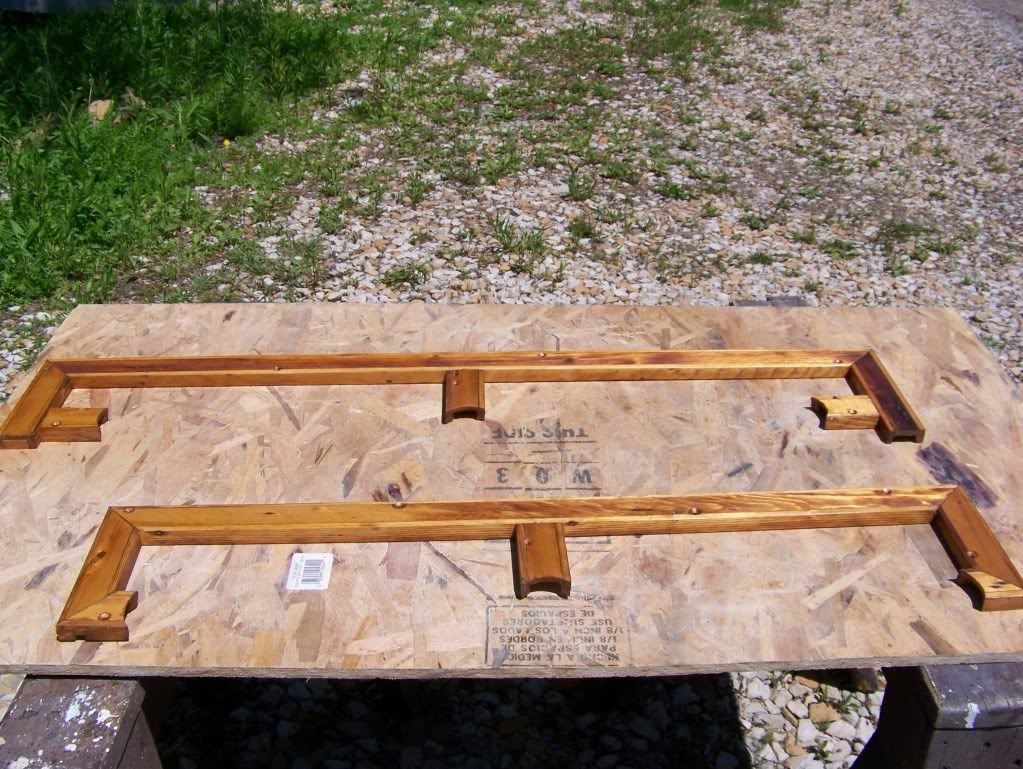
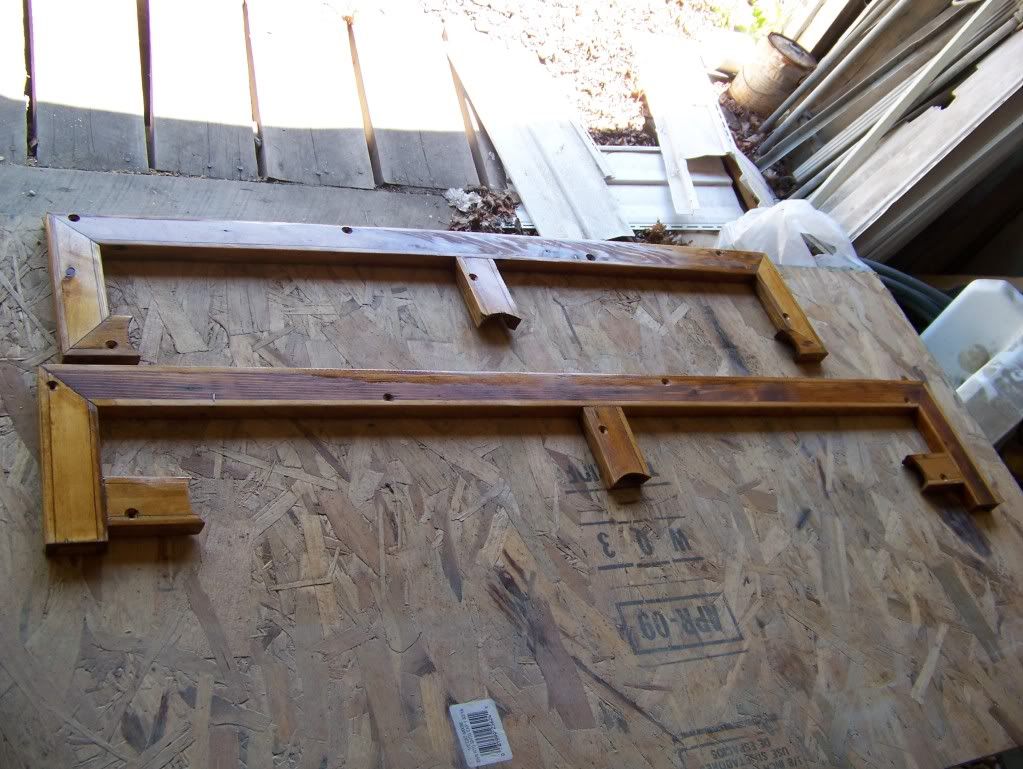
The wire way was made out of some old lath I saved off a job. Got zillions of the stuff. Great for certain applications. Ran it thru the planner, ripped it down to size, cut out the pieces very exact to measurement. Assembled the critter using dedicated pre-drilled mounting holes in pads and custom fit up to the lights.
This is what the raw finished product looked like. Nothing fancy, probably will not finish all that slick but you typically don't see it.
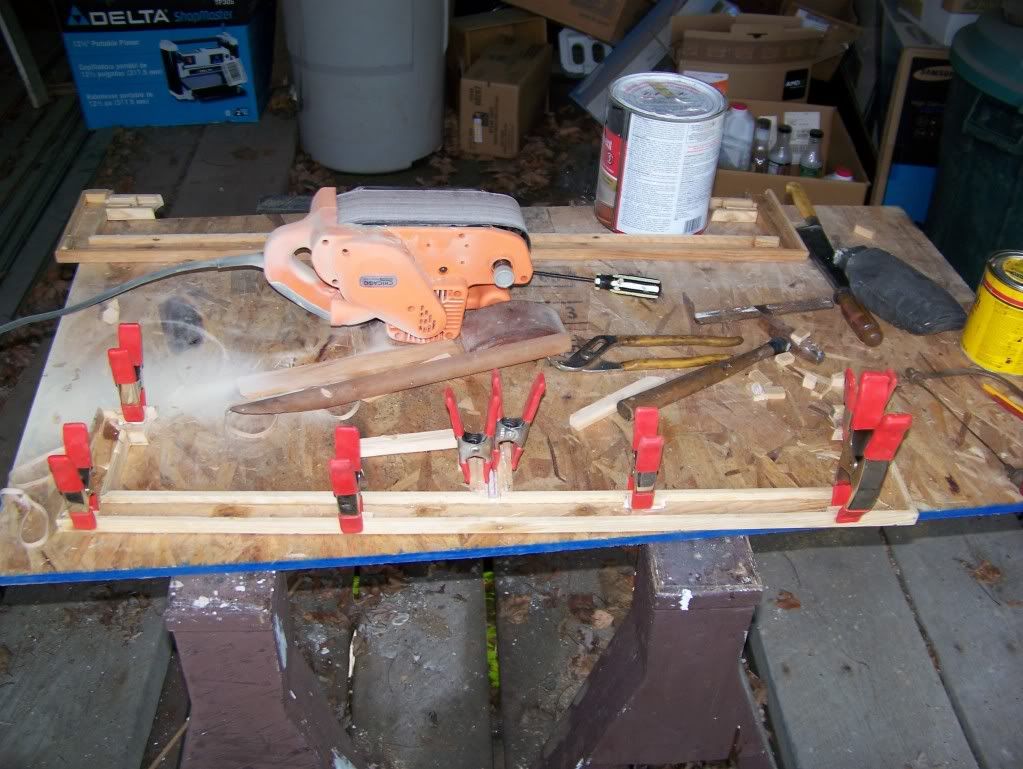
Slapped on some stain to about match the cabinets, a coat of poly. You can get a few man hours in one of these critters. Couple of pixs of that.
SIZE=2]
Finally do the wiring and install it. This light system had 5 lights but I only wanted 3, so the wires had to be modified anyway. Lots of extra wire, clunky sized connectors, this is a better idea than I thought, you need a bit of room to make it all fit, would have been a bear to made it into harness. Plus if there was a problem ripping apart the harness would not be that pleasant. This is very easy to just pop off for any reason. I have two spare light assembly, in this mode they are easy to swap out.
Pix of that operation
Finally install the critters. Test out them lights. These get hard wired into the circuit, it was planned during the kitchen rehab and wires were run for them at the time. This gives a nice back light to bounce out the light colored tile and light up that area way back on the counter. Plenty of light from above normally to the front working areas.
I think this is the better mousetrap from many angles. Looks better, more protection, lot easier to do any maintenance required. Don't know if there is anything commerical similar to this especially designed for the application. Maybe with all the unemployment a fellow could have a money making opportunity. Custom always beats crap out a box. This essentially cost me squat other than the lights which I bought surplus for like $8 for two sets, I had all the rest of the materials. Still have to make up a metal
cover box for those wire nuts.
Also did a back of door storage project. Could show you that once I get the pixs up. That is also a bit of the better mousetrap. Trying to use every bit of storage space in the old shack.
Finally the lights are on. The entire counter area has lights, florescence over the sink, nice to leave on as the only lights at night, running in for the beer or late night snak.
I always wondered how some folks tacked the installation of these lights on pre-existing cabinets. Do the lights come on when you turn on the main switch in the kitchen? Or are the lights wired elsewhere?
I always wondered how some folks tacked the installation of these lights on pre-existing cabinets. Do the lights come on when you turn on the main switch in the kitchen? Or are the lights wired elsewhere?
In my case the entire kitchen was rehab'd. Everything gutted except the cabinets were not taken down. All the old walls under the cabinets were removed, so I had fair access to plan out the wiring. I was able to plan it out for a dual switch in the ceramic backsplash to independently control the florescence over the sink and the undercounter lights. Each has its own switch.
Even so I did have a bit of a snarl trying to get the Romex - lamp cord junction box. You really want to run Romex behind the walls and bring it out to a proper interface point right under the cabinet. The lights I used came with a standard 115VAC pronged plug which is sort of clunky. That got cut off and on the left side I did the interface right at the cabinet wall, will have to invent a lil metal junction box to hold those wire nuts. On the right side I was able to snake the lamp cord thru the cabinet wall into a standard junction box w/ plate buried in a nook on the far side of a shelf.
Just installing them in a completed kitchen probably will be a real snarl for the wiring. Those kits contain too much wire between lamps and you also got to figure out what to do with that. In this installation I doubled it all up and taped it in a bulge. A lot of retrofits are going to look like a rat's nest under there. I've done them before taking the kit, measuring out the cabinet under area runs exactly, using a board and nails to make up a wiring harness ***, getting that all lashed up and then spiral wrapping the entire harness with electrical tape. Sort of works, faster than what I did here. But you always have that snarl of how do I get it hard wired into the power wiring. You could put in receptacles and wire them to be switched, plugging in the lights that way.
How they do it in the million dollar cabinet jobs, I have no clue. Maybe it is all preassembled into the cabinets with some type of junction box built in somewhere. I hate cabinets, if building a new house it will be few of them, I like a pantry and most of that space over counters open. Far to much junk in modern kitchens.
Most kitchens if you look under there it will be a rat's nest of stapled wires. Why I tried this approach shown in the pixs. There is an option of buying C-tubing like used in automotive wiring harnesses and trying to do it that way. Those big clunky connectors makes any method a challenge. They take up a ton of room for wire of that size.
Last edited by Cosmic; 06-24-2009 at 12:45 PM..
Reason: Spelling
Solid sheet of nicely veneered plywood to fit the entire underside of the cabinets. All the room you could want for wires, connectors, transformers, etc, and a nice clean look. Just cut holes for the lights.
Solid sheet of nicely veneered plywood to fit the entire underside of the cabinets. All the room you could want for wires, connectors, transformers, etc, and a nice clean look. Just cut holes for the lights.
I had thought of that idea. Couple of potential problem areas. The transformer sticks down below the cabinet lip about 1/8". So that would require its own cut out in the plywood. Has to be pretty precise, damn.
Second is heat buildup under there. Could you wind up trapping a lot of heat????
Third - The lamp lens mounting covers are a bear to install, they clip in and then rotate to lock. Not that easy with tons of room to manuever around them. Trying to do it flush or recessed would be very tricky, if not impossible. You would have to probably mount the lights first and then pray your cut out hole alignment was totally perfect to installed the plywood cover over them.
Fourth - It is more expensive, lot more area than assumed. Still have to build in a lil wall with screw mounting pads all around the edges, need a lot more of those.
Finally it would require a nice matching finish to the cabinets, still might look a bit strange once installed. For all those reasons I did not take that approach. Plus had no suitable materials on hand, would have to bought it. One of those ideas, simple to say but maybe more difficult to carry out.
As I did it here, pretty fool proof, you might get pretty good at it after a few installations. Speed comes with practice.
If I was a money needing boy, yeah I could put the show on the road. Actually if you look around and find any type of woodworking guy, they could do you one. Not that difficult a project to gin up. Just show them the pixs. You can modify the idea to put the lights where you want, either way back, in the middle, way up front.
I sort of stuck mine further back, I wanted to bounce light off those tiles. Maybe if I did it over would have tried to use all five lights in the string and done a more fancy layout with 3 lights further back and two up front. Make your run go sort of down the middle of the underneath, then branch off either side to go to the light location. Fun anyway you draw it up. Once you get a way to make up a cutting *** for the pieces could pop them out like spring flowers on a rainy day.
How could a guy be unemployed with all the good ideas that you could make money off? This is probably a fully unexplored area of great wealth. Maybe even sell them on TV. Too bad that one guy died.
That is a wonderful job on those lights. If I did it, I would be tempted to show everyone who came into the house the hidden lights. Be proud.
One thing I did notice, you need to change that outlet to a GFI. It is right by the sink and is dangerous. They are easy to put in. Change any outlets over the counters for safety.
Please register to post and access all features of our very popular forum. It is free and quick. Over $68,000 in prizes has already been given out to active posters on our forum. Additional giveaways are planned.
Detailed information about all U.S. cities, counties, and zip codes on our site: City-data.com.

 Please register to participate in our discussions with 2 million other members - it's free and quick! Some forums can only be seen by registered members. After you create your account, you'll be able to customize options and access all our 15,000 new posts/day with fewer ads.


 SIZE=2]