Please register to participate in our discussions with 2 million other members - it's free and quick! Some forums can only be seen by registered members. After you create your account, you'll be able to customize options and access all our 15,000 new posts/day with fewer ads.
Experiment as much as you can. Read as much as you can, either at your local bookstore, or online (lots of great online lessons, tutorials, and knowledge repositories). It is easy to get overwhelmed by all the technical details, but once you get an understanding and play around with the settings, they will become second nature.
Then you can focus on the really important stuff -- seeing! A poorly composed but technically perfect shot is still a poor image. A great composition with less than perfect technical aspects can still be a great shot.
I thank you for your advice. You helped a great deal. I certainly understand your last paragraph also. Makes perfect sense.
This is great information, Fuzz. Thank you so much, however, you lost me on the '30' second part. How/where do you set the shutter speed?
I think this camera goes up to 1600 ISO. "High" means the higher number and not the lower number, right? I ask because I saw someone saying they set their ISO to 100.
I think I am with you on all the rest. lol
Clearly NYC is not the place to be taking such breathtaking pics, but when I head back home to my lovely home island of St. Thomas, I hope to put this to the test. I think, however, I can use these same steps for the NYC city lights too, right?
Thanks again friend.
This is great that you are learning to set your new DSLR manually. That is really the first step. Heck, once you get the hang of it it is not that hard. I even taught my 7 y/o to shoot in manual mode on his Canon point and shoot. However he does practice a bit and that is the key. Take a shot, then look at it in the LCD - thats called chimping. Also learn to use Canon's built-in meter which you can see through the view finder. It slides back and forth metering the light of the scene as you manually adjust.
Back to nightscapes and star shots. Take a look on this map for your closest dark sky location - Dark Sky Finder.
Just in doing a quick look at your area it looks like the little island of Nantucket or Cherry Ridge Wild Forest would have the darkest skies. Although a bit of a drive. It might make for a fun weekend trip sometime.
Once you get somewhere dark out of the light polluted areas shoot as wide as you can go - 18mm. Then open up the lens all the way - aperture number (f3 or f4 probably). Then shot for ~ 30 seconds to avoid star trails. All of this on a tripod. And get an inexpensive cable release/remote switch so you don't have to touch the camera. Like this - Canon Remote Switch.
Very nice!
Hope you don't mind, but I took your picture and mapped the constellations for better identification of what's what (red = constellation, green = planet/star/asterism):
Hey Fuzz,
Thanks for mapping these out. I had a feeling the really bright ones were planets.
This is great that you are learning to set your new DSLR manually. That is really the first step. Heck, once you get the hang of it it is not that hard. I even taught my 7 y/o to shoot in manual mode on his Canon point and shoot. However he does practice a bit and that is the key. Take a shot, then look at it in the LCD - thats called chimping. Also learn to use Canon's built-in meter which you can see through the view finder. It slides back and forth metering the light of the scene as you manually adjust.
Back to nightscapes and star shots. Take a look on this map for your closest dark sky location - Dark Sky Finder.
Just in doing a quick look at your area it looks like the little island of Nantucket or Cherry Ridge Wild Forest would have the darkest skies. Although a bit of a drive. It might make for a fun weekend trip sometime.
Once you get somewhere dark out of the light polluted areas shoot as wide as you can go - 18mm. Then open up the lens all the way - aperture number (f3 or f4 probably). Then shot for ~ 30 seconds to avoid star trails. All of this on a tripod. And get an inexpensive cable release/remote switch so you don't have to touch the camera. Like this - Canon Remote Switch.
Most of all have fun with it.
Derek
Well this was a pleasant surprise and addition. Thank you for the tips. I will put these tips to practice and see what I come up with.
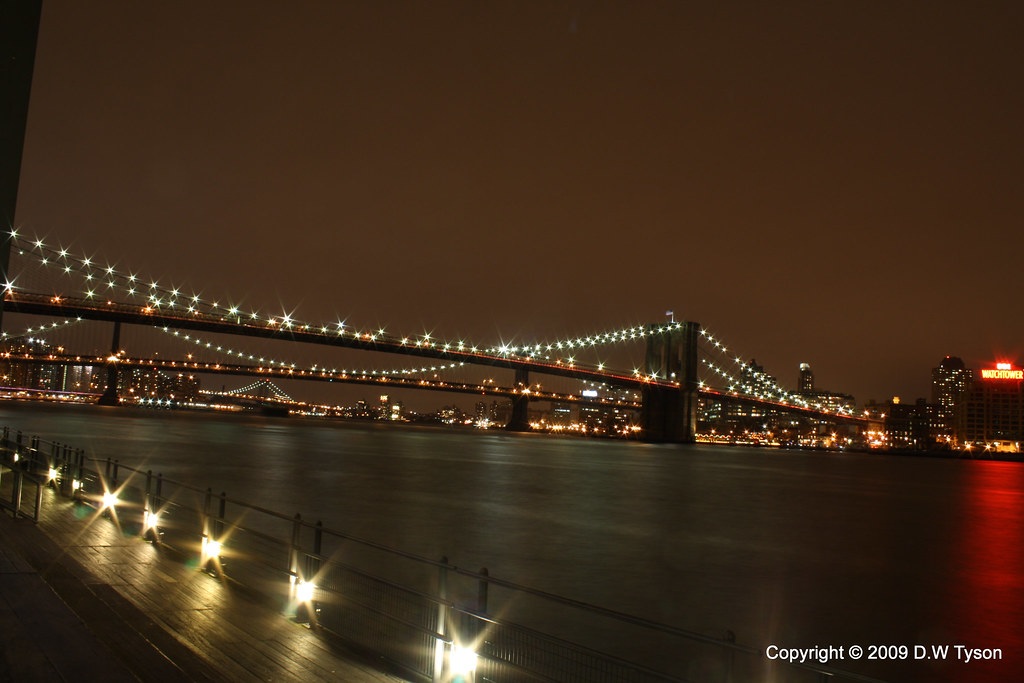
I want to thank Fuzz and MtnSurfer for helping a brother out and pushing me to start "metering" and using tips for night shots. While I still might be clueless as to what I am doing, I am improving I think. Here were a couple of shots I took downtown:
(I purposely underexposed this one)
My girlfriend took the pic below as we learned how to partial/spot meter:
Wow, Big Improvement D.W.! It looks like you are really learning this night time photography stuff and more importantly your camera quickly. Great Job!
Great shots, Insane! Love the bridge and the candle ones particularly. On the bridge one, try straightening the horizon and cropping out the empty sky -- it'll turn into a very nice panoramic view.
Please register to post and access all features of our very popular forum. It is free and quick. Over $68,000 in prizes has already been given out to active posters on our forum. Additional giveaways are planned.
Detailed information about all U.S. cities, counties, and zip codes on our site: City-data.com.

 Please register to participate in our discussions with 2 million other members - it's free and quick! Some forums can only be seen by registered members. After you create your account, you'll be able to customize options and access all our 15,000 new posts/day with fewer ads.


 (I purposely underexposed this one)

